


How to Add PayPal to WordPress (3 Simple Methods)
If all you need is to take a payment, you do not need a full ecommerce setup. There are two ways to get PayPal working on a WordPress site: install a plugin, which is better if you are selling more than a couple of things, or embed a PayPal button directly into a page, which takes about five minutes. Both are below.
If you would rather have this handled for you, we offer ecommerce website design. You might also find how to set up Stripe useful.
Table of Contents
- Why Link PayPal to WordPress?
- Method 1: Using a PayPal Plugin
- Method 2: Embedding a PayPal Button
- Method 3: Using Elementor Forms
- Testing Your PayPal Integration
- Tips for a Smooth Checkout Experience
Why Link PayPal to WordPress?
PayPal is a trusted and widely used payment gateway that allows you to receive payments securely and quickly. Whether you’re selling products, collecting donations, or offering services, integrating PayPal into your WordPress site makes transactions simple for both you and your visitors.
Method 1: Using a PayPal Plugin
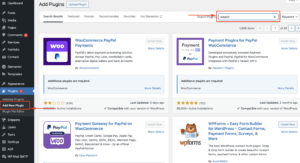
One of the easiest ways to add PayPal to WordPress is by using a plugin. Here’s how:
- Go to your WordPress dashboard.
- Navigate to Plugins > Add New.
- Search for “PayPal” and choose a plugin like WPForms, Easy PayPal Button, or PayPal Donations.
- Install and activate the plugin.
- Follow the setup instructions, usually involving pasting in your PayPal email address and choosing options like product name, price, and currency.
These plugins often offer shortcode or block support to place the PayPal button anywhere on your site.
Method 2: Embedding a PayPal Button
If you don’t want to use a plugin, you can create a PayPal button directly from your PayPal account:
- Log in to your PayPal account.
- Go to PayPal Buttons (under Tools or Business Tools).
- Create a new button (Buy Now, Donate, Subscribe, etc.).
- Customize the button and copy the HTML code.
- Go to your WordPress page or post.
- Switch to the HTML view and paste the code where you want the button to appear.
This is a lightweight method and doesn’t require any plugins.
Method 3: Using Elementor Forms
If you’re using Elementor Pro, it comes with a built-in way to connect forms to PayPal. It’s great for selling simple products or services directly through a form.
- Open the page you want to edit with Elementor.
- Add a Form widget.
- Under Actions After Submit, select Webhook.
- Set up the webhook to send data to PayPal or use a third-party automation tool like Zapier.
There are also Elementor add-ons like “Elementor PayPal Button” that simplify this process with ready-made widgets.
Testing Your PayPal Integration
Before going live, it’s smart to test your setup:
- Use PayPal’s Sandbox environment to simulate transactions.
- Check email confirmations and payment redirection.
- Make sure the payment goes through and the user ends up on a thank-you or confirmation page.
Testing helps avoid surprises and builds user trust.
Tips for a Smooth Checkout Experience
- Keep it simple: Too many steps can cause drop-offs.
- Add product images and clear descriptions.
- Ensure mobile responsiveness.
- Display trust badges or security indicators.
- Redirect users to a thank-you page for confirmation and next steps.
Adding PayPal to your WordPress site is a quick win to start accepting payments. Whether you’re using a plugin, embedding code, or leveraging Elementor, there’s a solution that fits your needs and technical comfort level.